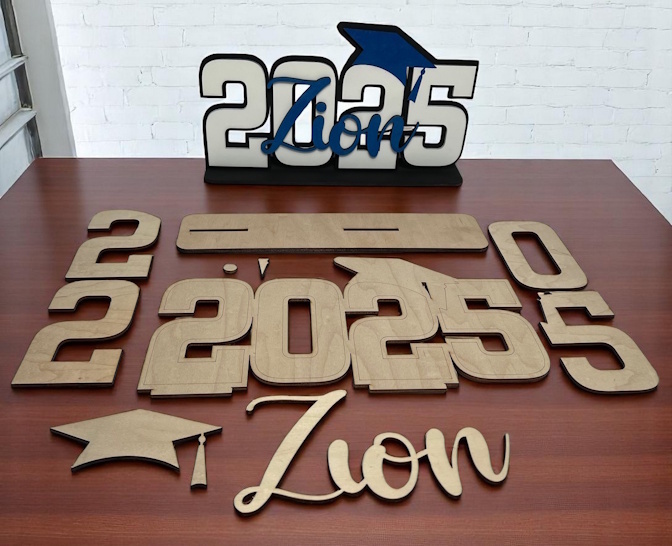
DIY Graduation Sign Assembly

Materials Needed
• Paint or stain colors of your choice (see step 2)
• Glue (recommend super glue)
1) Read through these instructions before doing anything. Ensure you have all parts and hand
place them to make sure you understand how it will go together. Some of the parts can be fragile
so use caution while painting and assembling to avoid breaking anything.
2) Paint all parts in the colors of your choice. Almost any paint/stain will work,
but a few light coats of spray paint is probably the easiest and fastest. Try not to get too much
paint in the engraved areas that will be used to align the name if your centerpiece is engraved
(see step 6). You can paint both sides of the backer and name if desired, but do not paint the back
of the numbers or cap. Whether you go gloss, matte, or mixed is up to you. The version we
created is matte black and white with a pearlescent blue for the cap and name. Brighter colors will
work best for the cap and name.
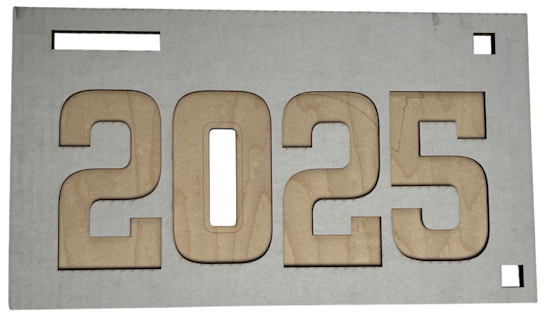
3) Once the paint is completely dry, place the sign backer in the cardboard alignment template and
flip both over so the number side of the template is facing up. Working one at a time remove the
liner from the double sided tape on the back of the numbers. Carefully align to the template and
gently drop each number in place. Apply some pressure to firmly adhere the numbers to the backer.
Caution!
If you have not applied pressure it is possible to remove a misplaced part, however, once
pressure is applied the bond is permanent! If you have an engraved centerpiece make sure
you DO NOT accidentally put the 0 in upside down!
(Note that the template pictured below was a protoype. The latest version will be slightly different
making it impossible to accidentally swap the 2's)
4) Once all the numbers are adhered, remove the liner from the back of the cap.
Carefully align the cap to the cutouts of the 2 & 5. Once happy with the fit, apply
pressure to bond permanently.
5) Remove the liner from the back of the upper left corner of the 5.
Like the cap align it and apply pressure.
6) Gluing the name
If you ordered 1-4 centerpieces we engrave the name into the numbers. This
creates a guide that the name will fit into. Choose a few spots in the engravings
on the numbers and apply a drop of glue. Note that you only need a few drops
across the name to permanently affix it. Once you have applied the glue,
carefully place the name in the engraved slot. When happy with the fit apply light
pressure until the glue sets up. Alternatively you can place a flat heavy object
like a book on top of the name to help while the glue dries.
If you’ve ordered more than four centerpieces we will include a second cardboard
template to align the name to the numbers. Place the template over the numbers and
cap. Looking through the template identify a few spots on the numbers to apply the
glue to. Take care not to glue the template to the numbers or name! Once the glue is
applied drop the name into the template. If possible remove the template ASAP
before the glue sets just in case and apply gentle, even pressure, until the glue sets.
Example Glue Spots

7) The sign can then be slotted into the base and kept loose, or a few drops of glue
can be used to permanently attach them together.
